Setting Up Spatial Markers
This guide provides step-by-step instructions and best practices for setting up Spatial Markers for map alignment.
These markers play a key role in precisely anchoring the virtual map to the physical environment and enabling automatic floor level calibration. While they require more setup than Spatial Anchors, they deliver faster and more consistent alignment results.
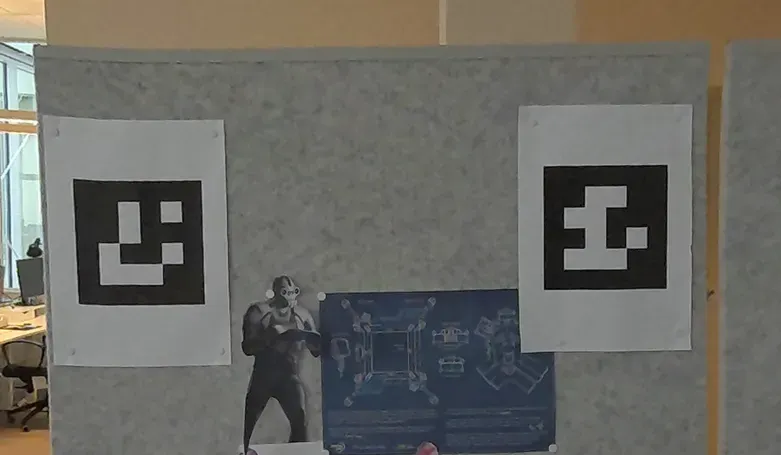
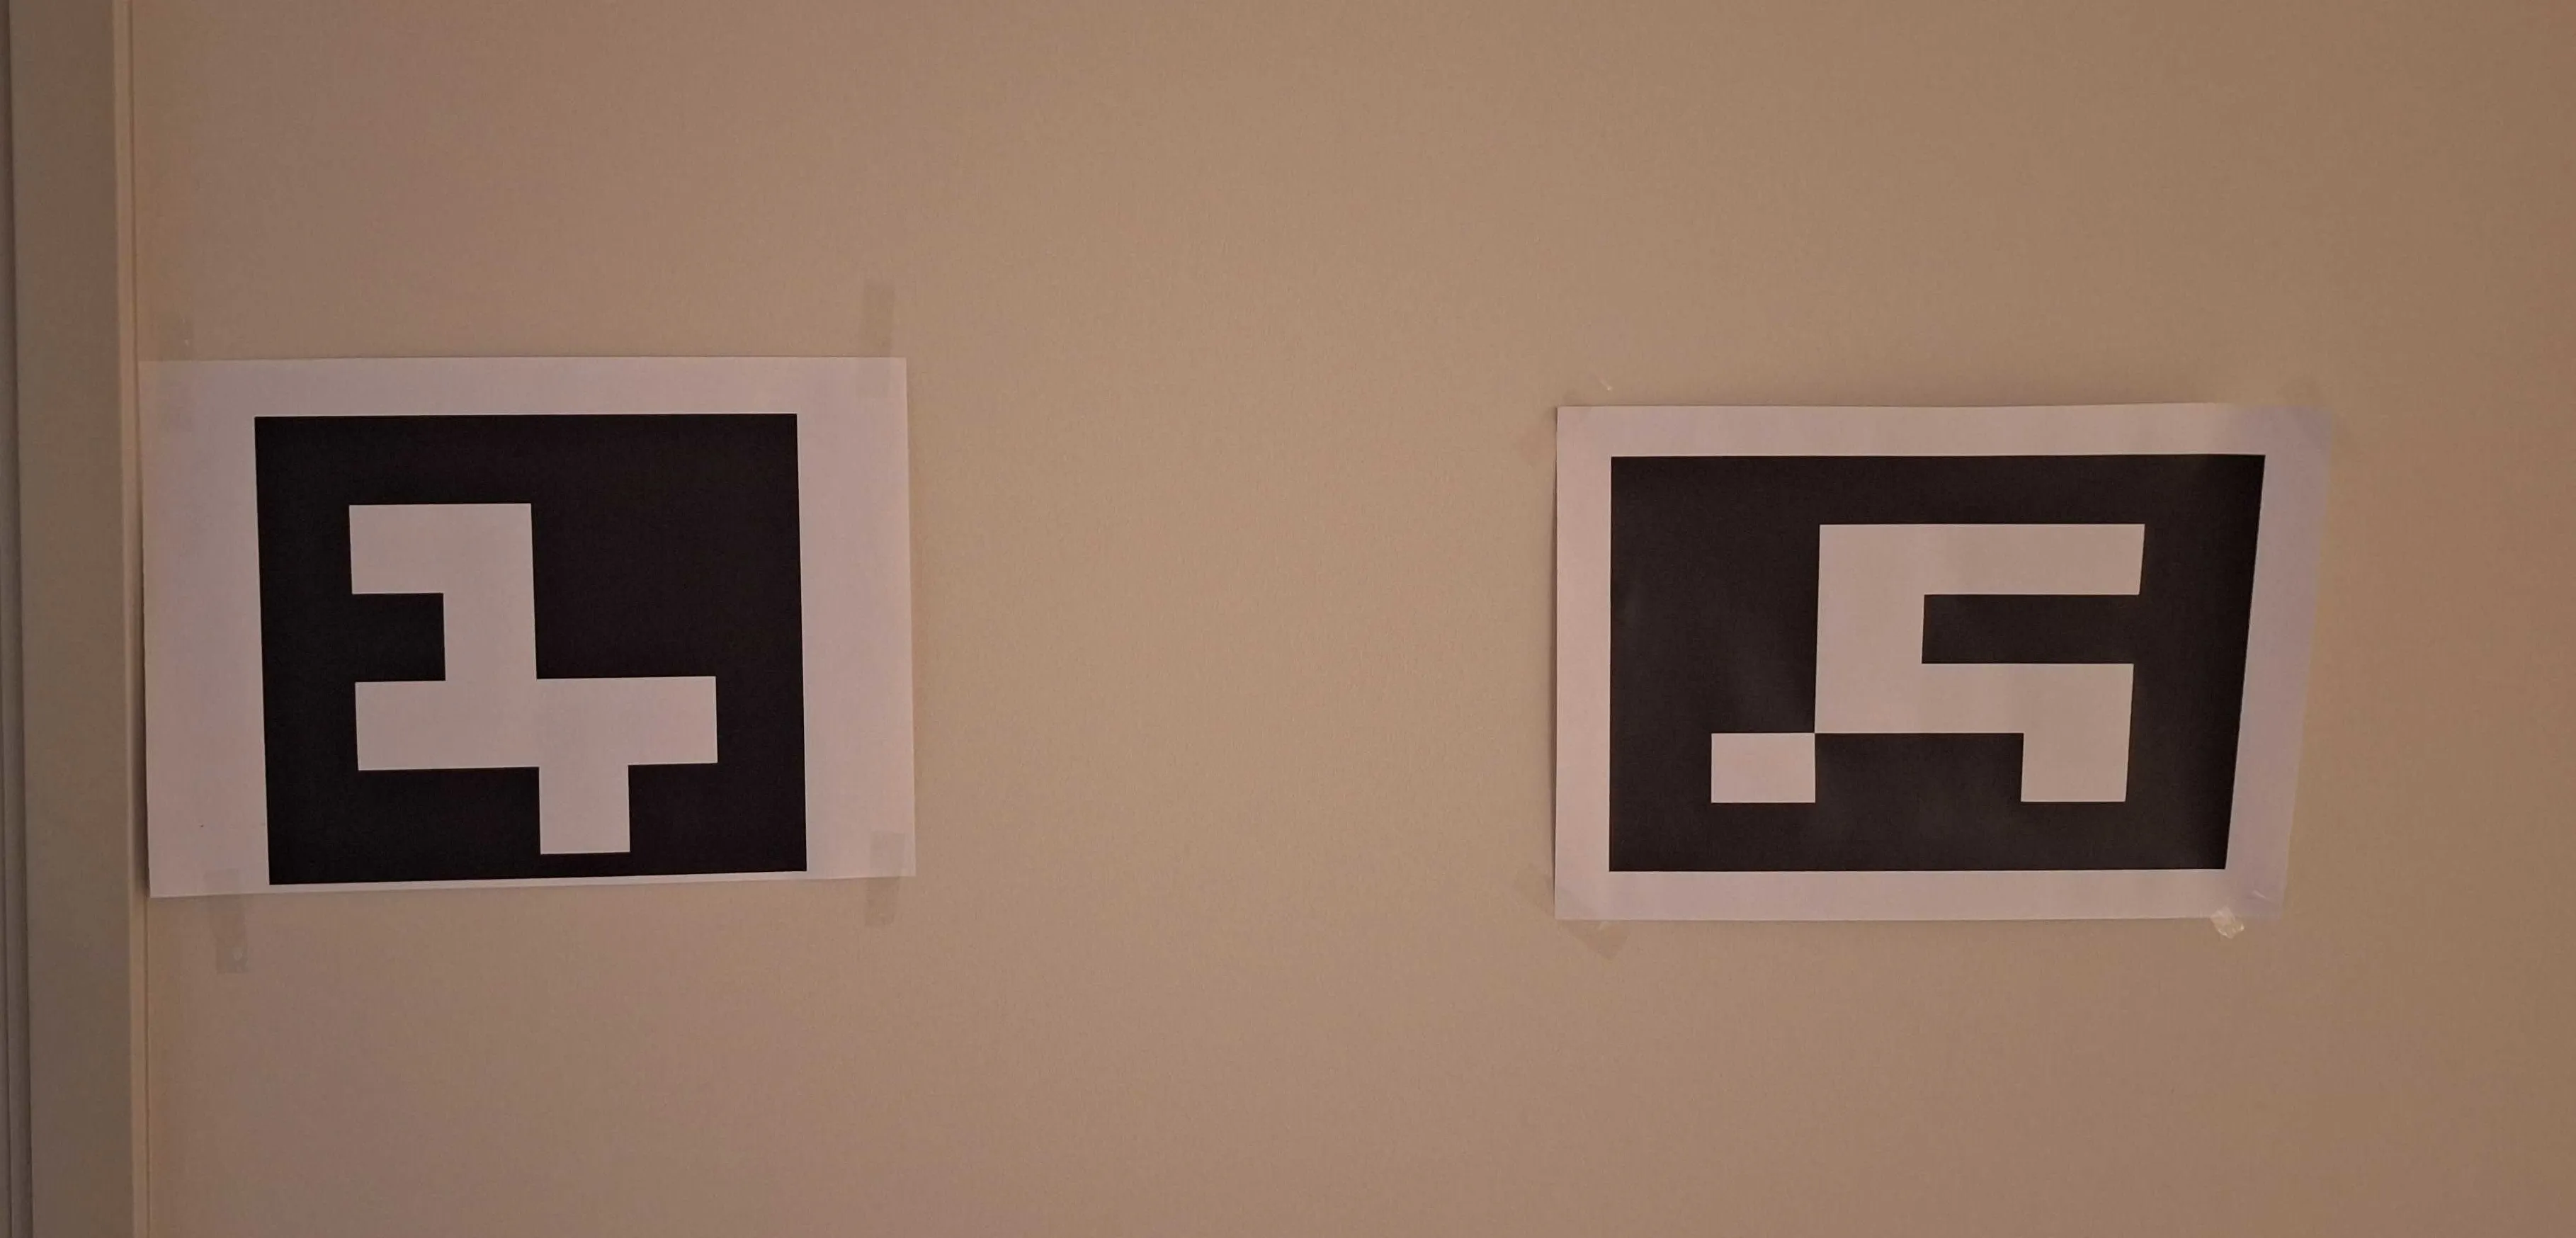
For a single map, you need to print two (2x) Spatial Markers, as shown in the image below:
Supported Devices
Section titled “Supported Devices”Spatial Markers are only supported on Meta Quest 3 and 3S headsets.
Marker Purpose
Section titled “Marker Purpose”- Spatial Markers are used to determine both the position and orientation of the map in a physical space. The game also uses these markers to automatically adjust the floor level.
- Floor level is saved as part of the map data and may be dynamically adjusted during gameplay when players align the map and see a green outline around the markers.
- You can have multiple maps attached to the same pair of markers.
- You can have different maps using different marker pairs as long as only one of the pairs is visible to the headset when the map is created. Otherwise you can temporarily cover irrelevant markers during the map creation to avoid confusing the headset.
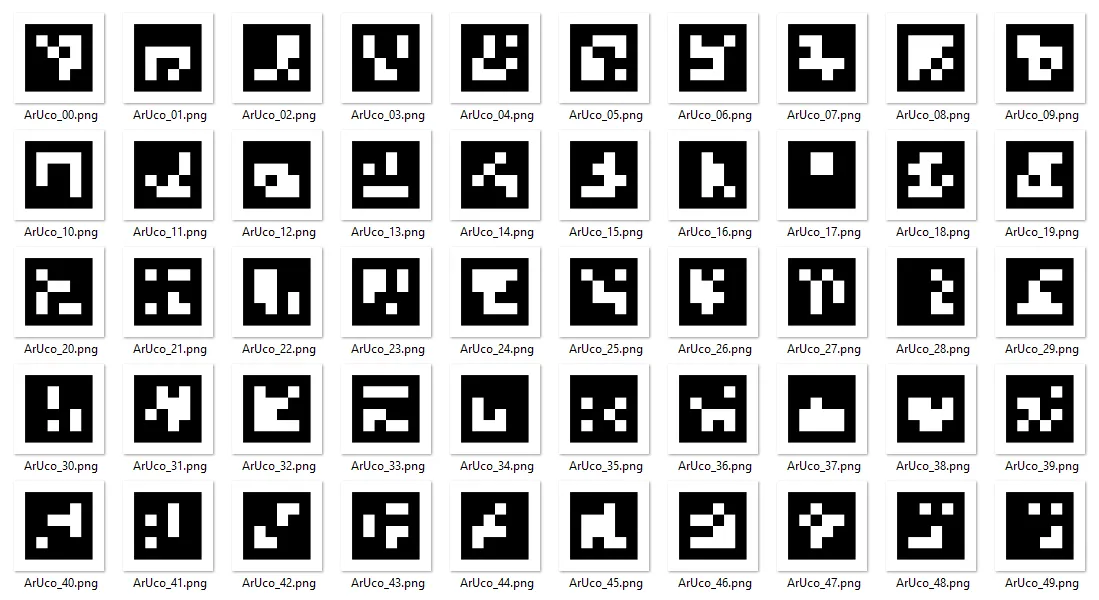
Marker Pattern
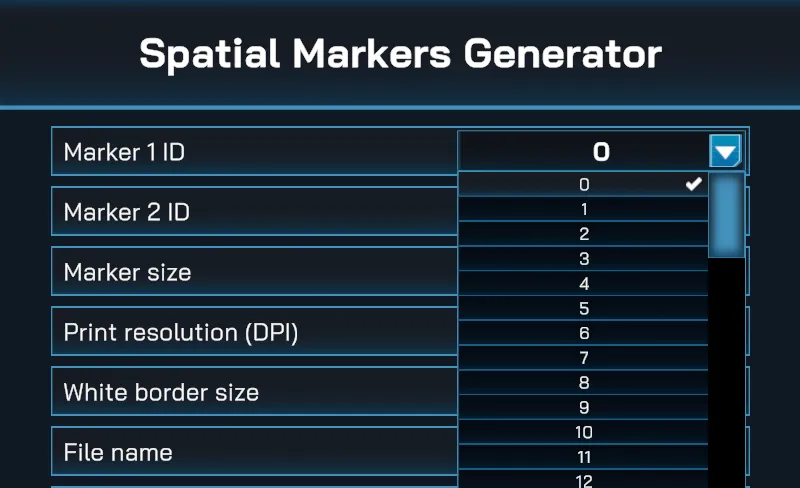
Section titled “Marker Pattern”- Each pattern represents a number from 0 to 49
- For a single map, you need two (2x) Spatial Markers.
- You can use any pair of marker IDs (patterns) from the DICT_4X4_50 dictionary. There’s no requirement on the specific numbers, as long as they are not the same.
How to get the markers
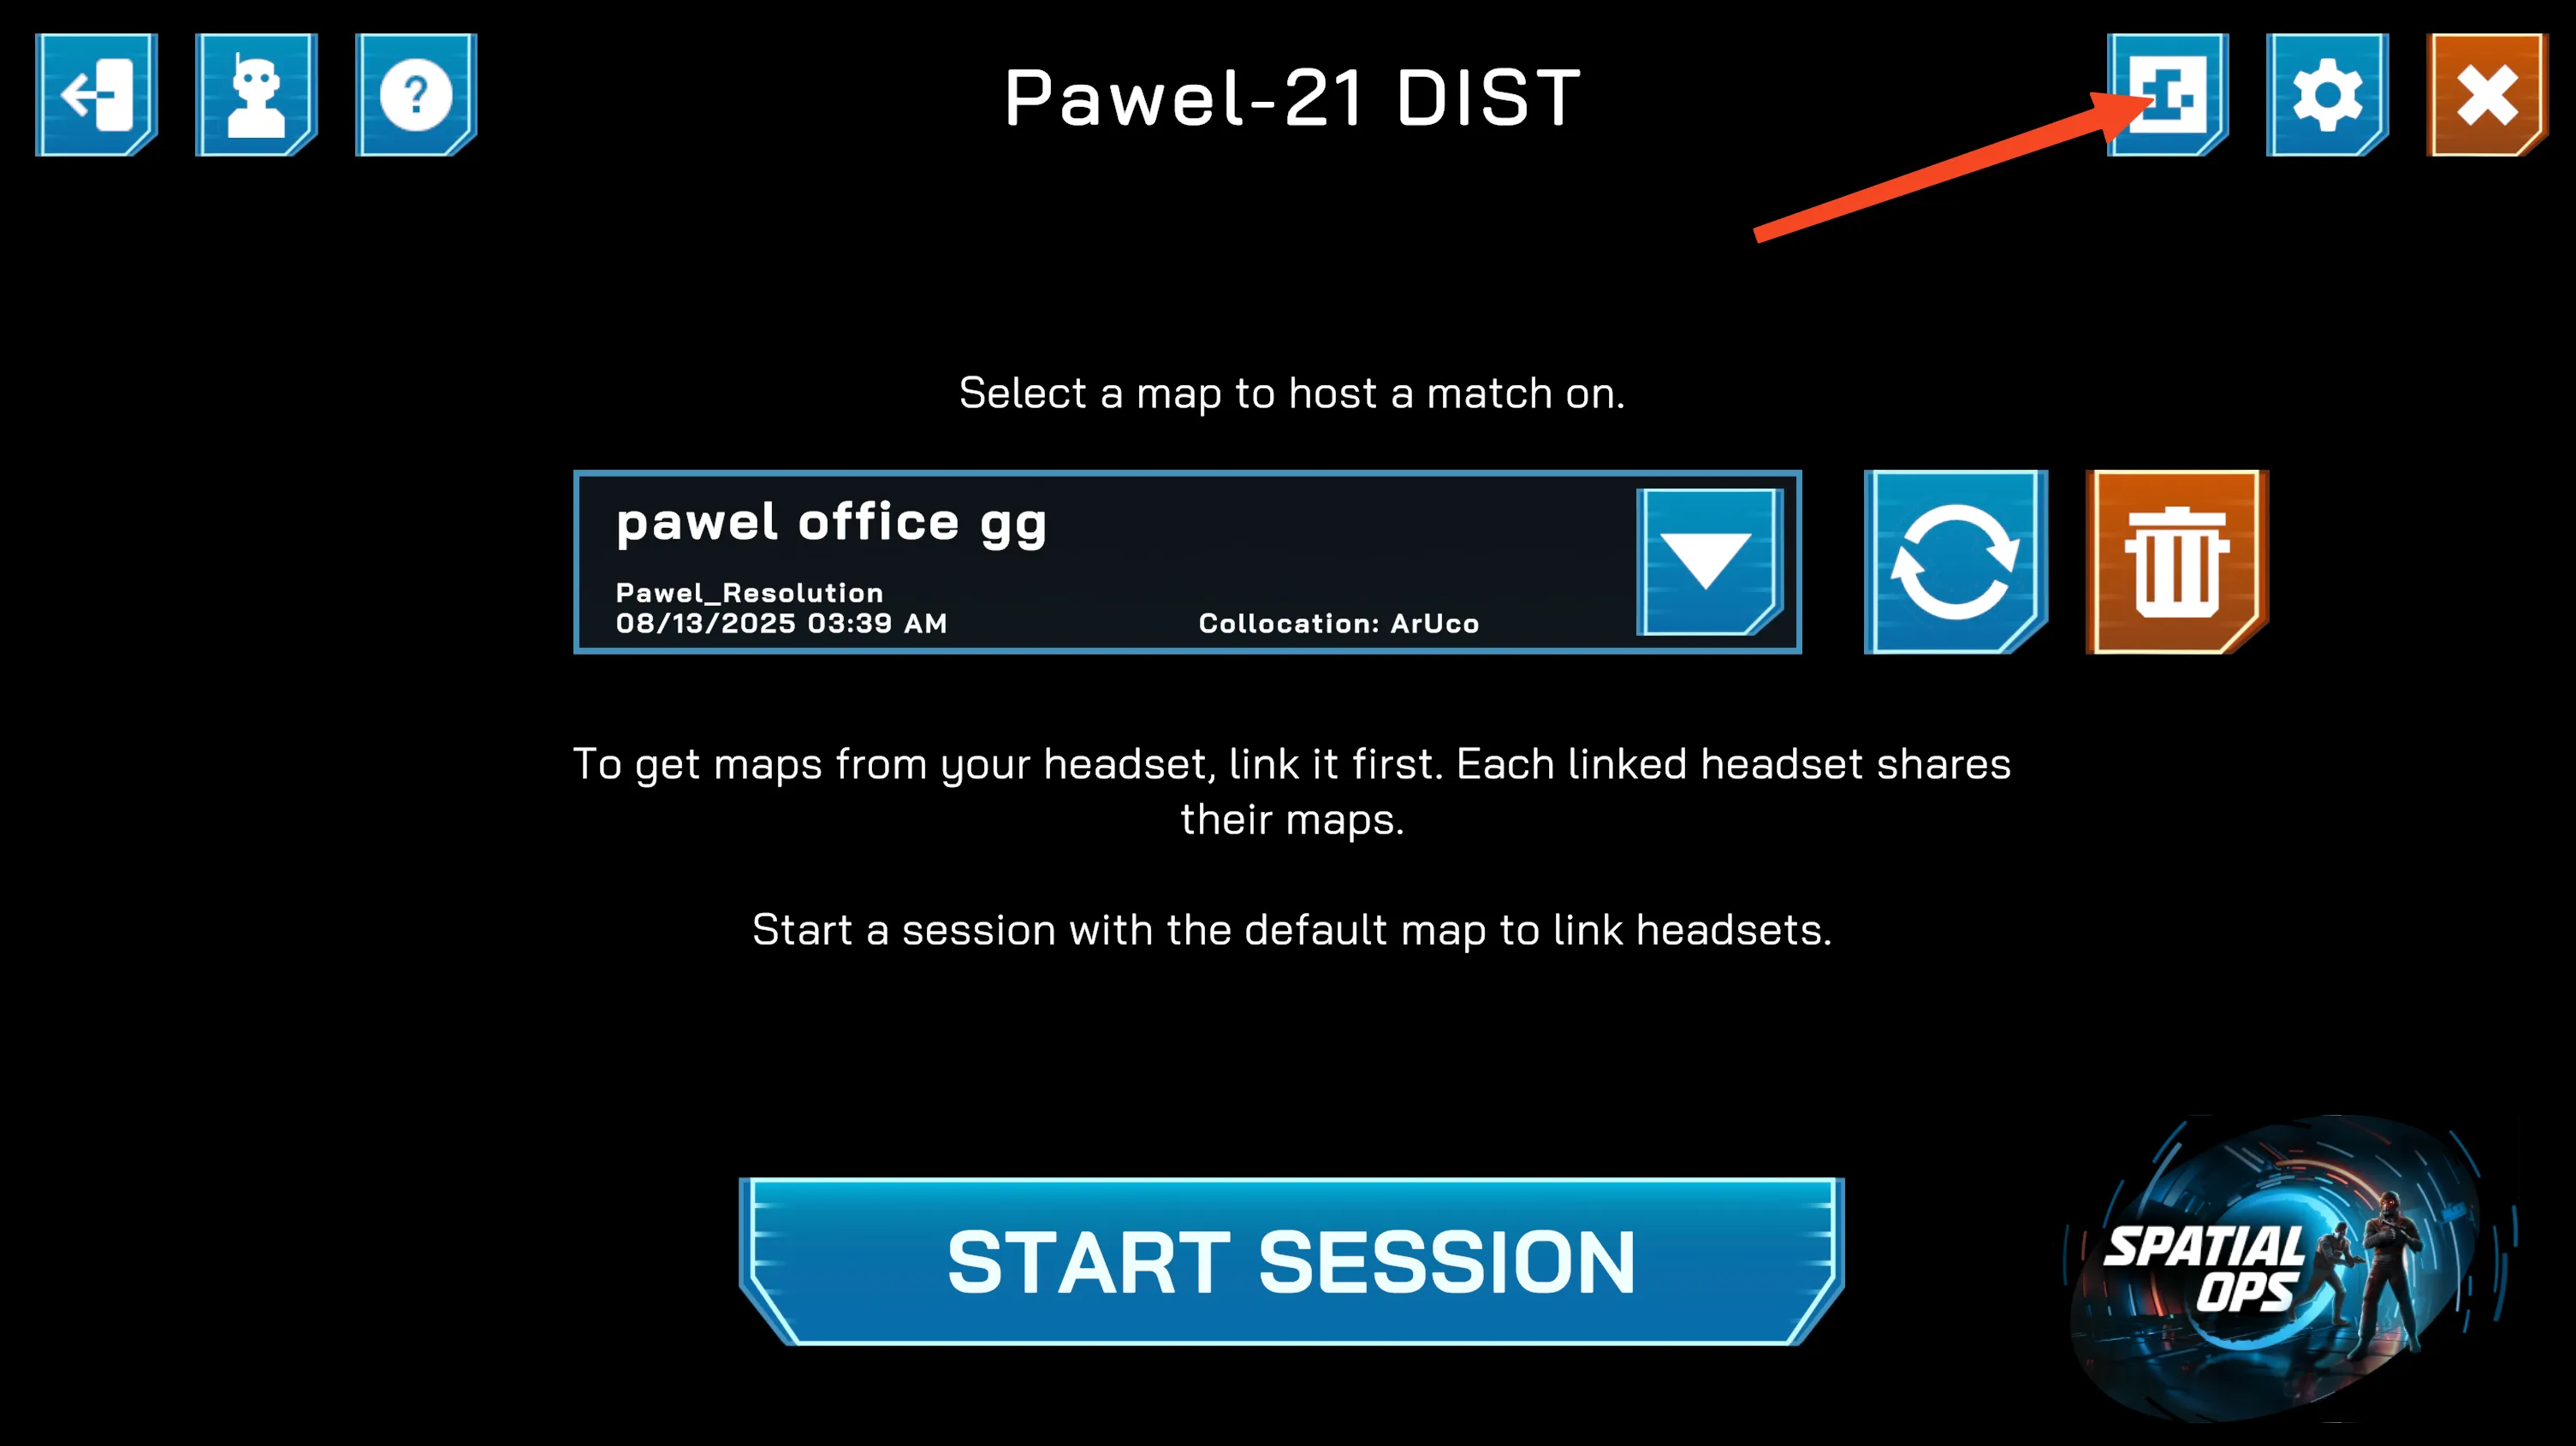
Section titled “How to get the markers”Generate markers through Spatial Ops Manager app
Section titled “Generate markers through Spatial Ops Manager app”-
Start Spatial Ops Manager and press the Marker icon in the main menu
-
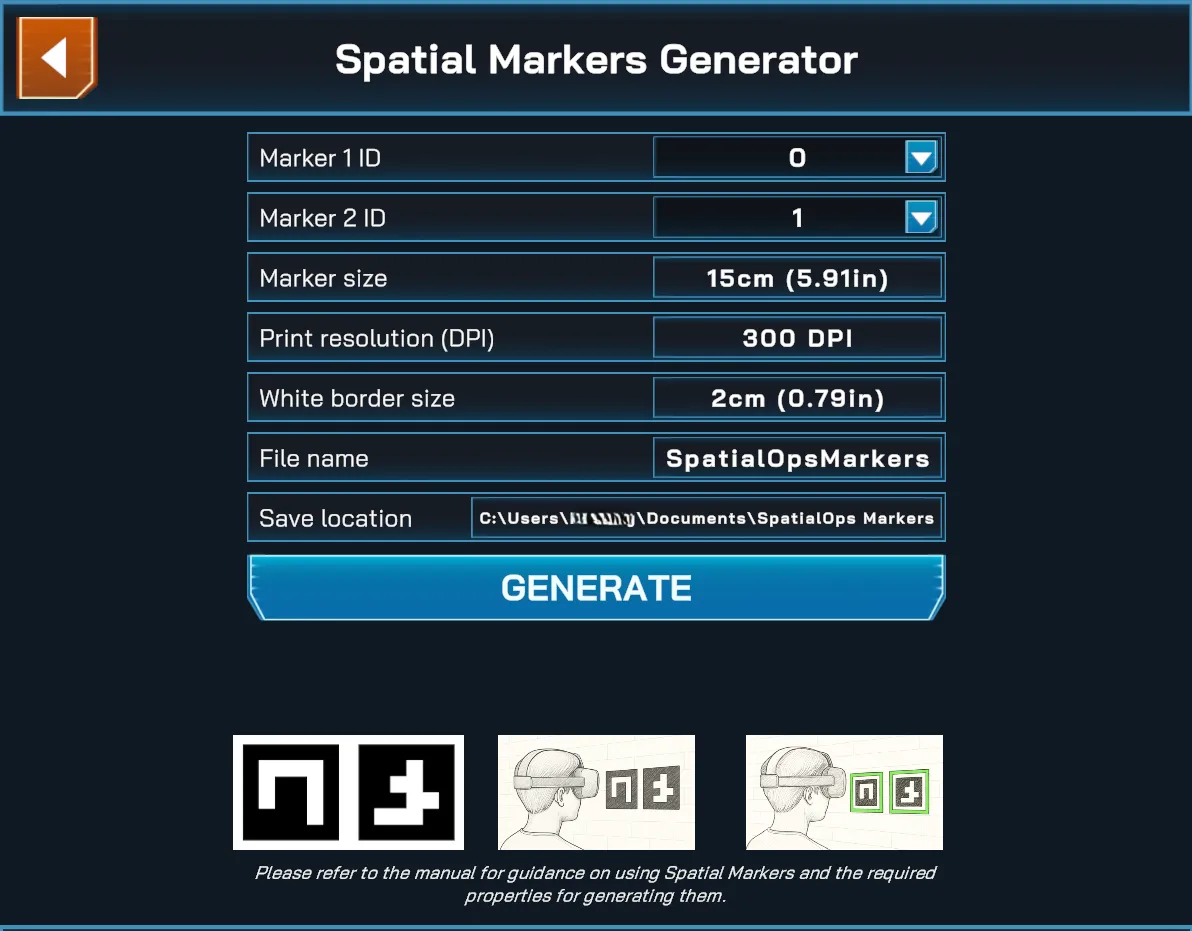
You will be presented with the export options panel
-
Choose marker IDs, size, and print resolution
-
Press the Generate button
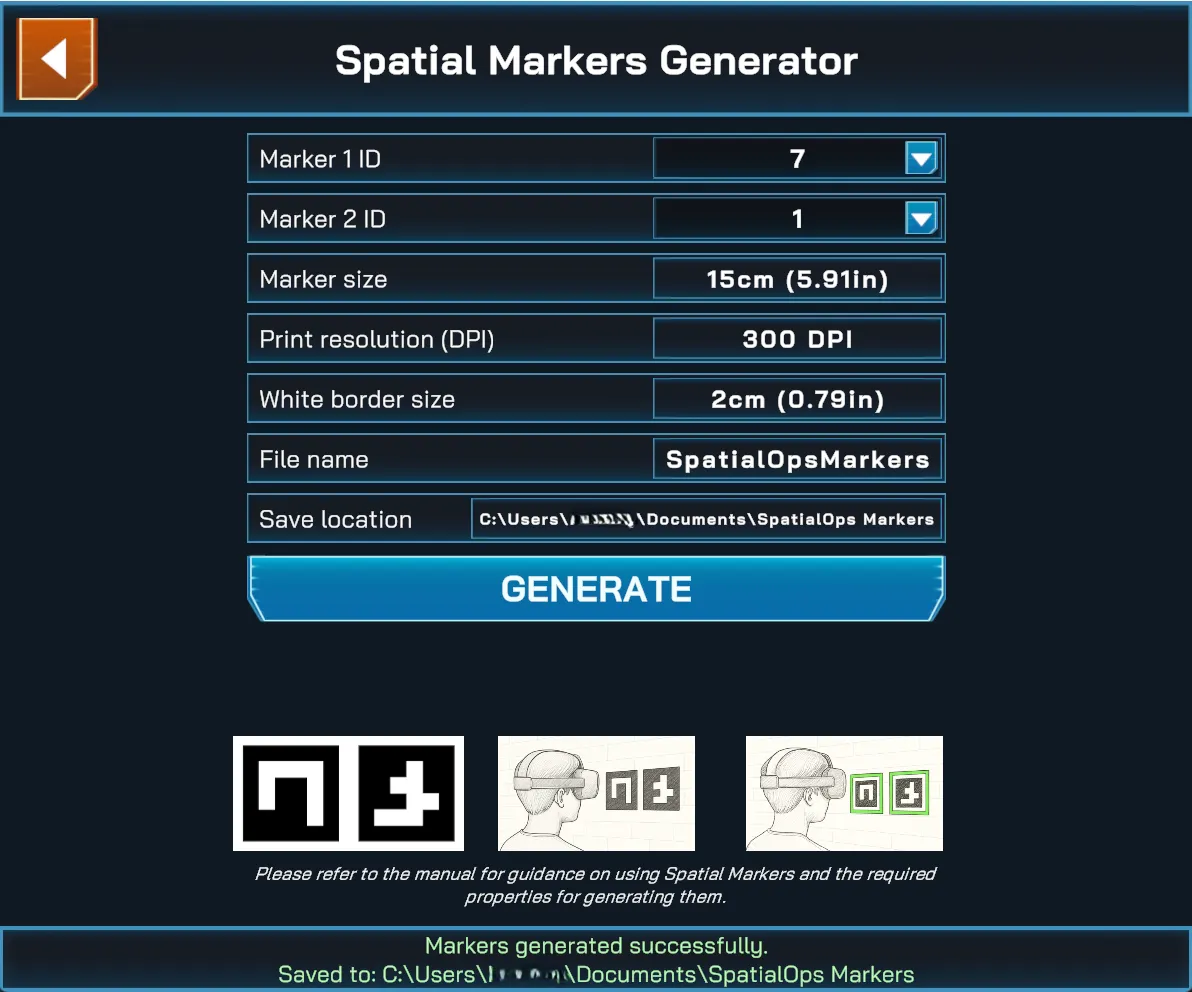
-
It will automatically open File Explorer with generated markers in 2x versions
- 2x separate markers
- one combined image with both markers
-
If you want to generate the markers without white borders you can set the
White border sizesetting to0cm -
On macOS, the save path must be inside your Downloads folder due to system restrictions.
Alternatively, download markers from the following library
Section titled “Alternatively, download markers from the following library”https://drive.google.com/drive/folders/1QOzipYHPSJcqzR6rmQxXJxhcpi6AFhqq?usp=sharing
Marker Size
Section titled “Marker Size”Marker size refers to the width/height of the black border, not the white margin. White margins are optional but strongly recommended, especially if markers are placed against dark or visually noisy backgrounds. Markers generated through the app or downloaded from the library already include this white margin.
How to choose the right marker size
Section titled “How to choose the right marker size”- Bigger markers do not mean better alignment.
- Decide where players will stand when aligning the map.
- 1-3 meters from the marker is the recommended distance.
- At the selected distance, the markers should occupy 20-40% of the headset’s vertical field of view.
- 10-50 centimeters is the recommended size range
Placement Guidelines
Section titled “Placement Guidelines”Once you have selected and downloaded your markers, they require specific placement to ensure reliable tracking and map alignment.
-
Markers must be placed on a completely flat and stable surface.
-
Both markers must fit within the headset’s field of view from the player’s preferred onboarding distance.
-
Markers must be arranged horizontally, with at least 50 centimeters between the centers — perfect horizontal alignment is not required.
-
Markers must be placed in a well-lit environment, not covered by shadows and without glossy reflections.
-
Markers must not be cropped or stretched.
-
Markers must be positioned in the correct left-to-right order and must not be swapped — use the Map Editor’s realign feature if this happens.
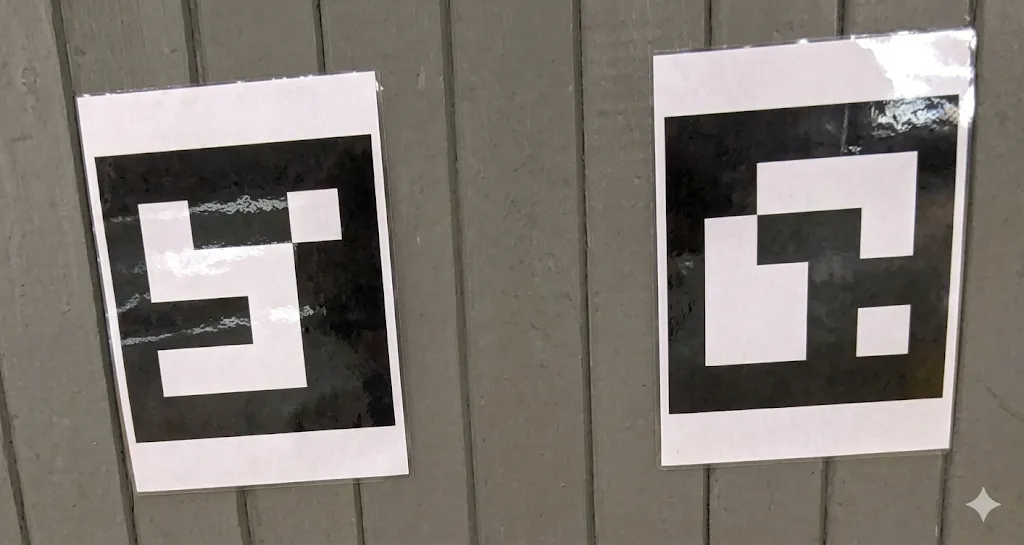
Examples
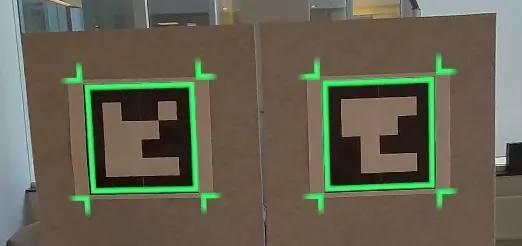
Section titled “Examples”✓ Correct Markers are flat, well-lit, non-reflective, and properly spaced.

✗ Incorrect These markers are laminated — glossy reflections will interfere with detection.
✗ Incorrect One of the markers is cropped, while the other one is stretched.
Marker Detection
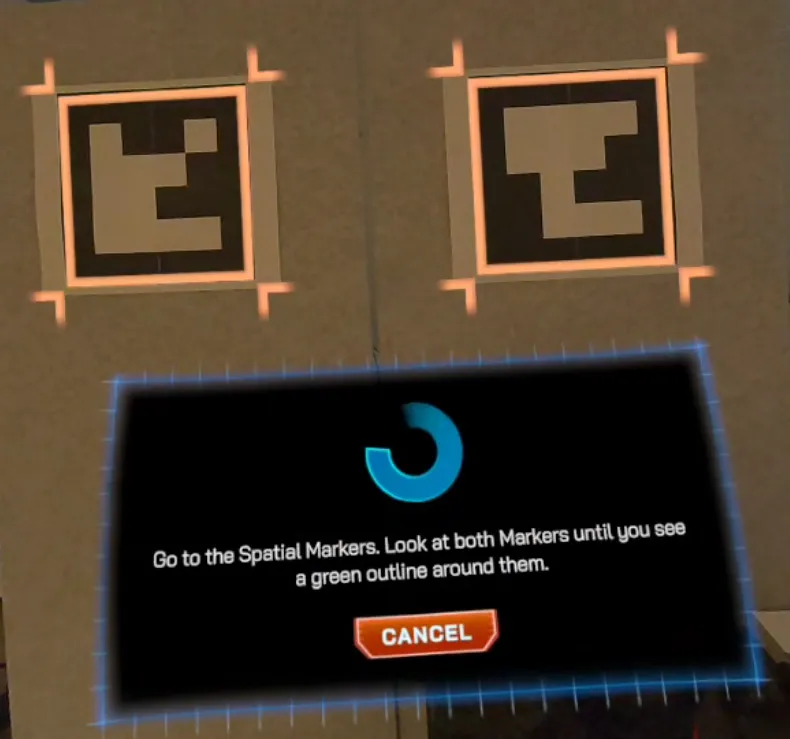
Section titled “Marker Detection”To ensure the most accurate map alignment, the game automatically discards any unreliable tracking data. This can occur if the headset is moving, positioned too far or too close to the markers, or not facing them at a direct angle.
If you see only one marker outlined, or if progress frequently resets, try adjusting your position or remaining still. We recommend instructing players to stand still at the onboarding location and look directly at both markers until a green outline appears, confirming successful alignment.
Creating a Spatial Marker Map
Section titled “Creating a Spatial Marker Map”To create a map that uses Spatial Markers, you need to convert a new or existing spatial anchor map. Follow this step-by-step process:
-
Set your headset’s system floor level correctly. This will be stored with the map.
-
Link your headset to a manager organization, if it’s not already linked.
-
Create a new map or open an existing one.
-
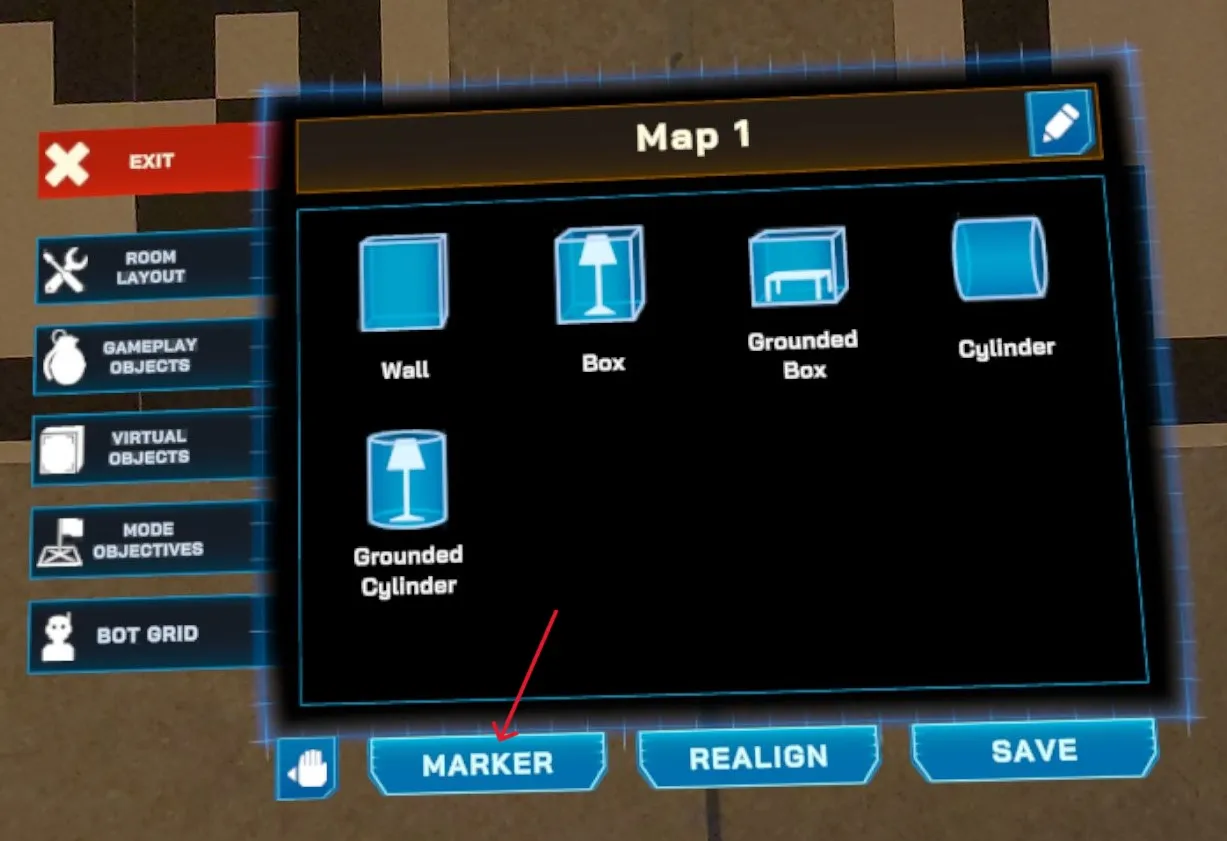
In the bottom-left corner of the map editor panel, press the “Marker” button.
-
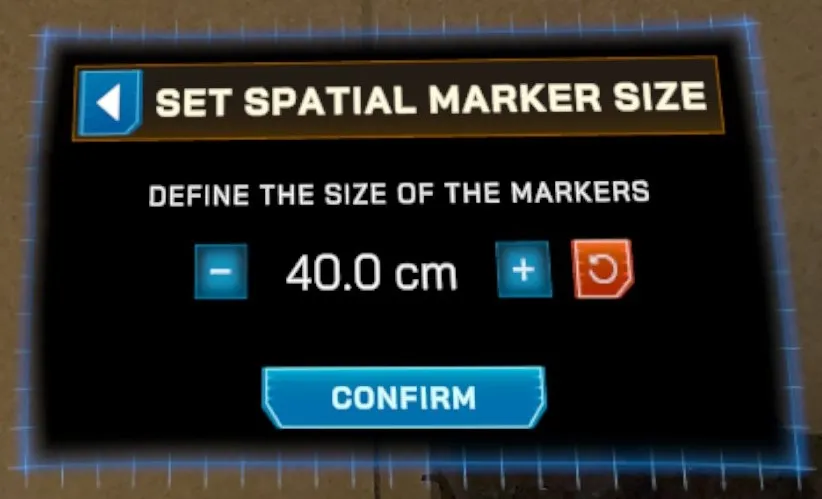
Enter the marker size. This must match the exact physical size of your printed Spatial Markers. Then, press Confirm. It is very important to enter the correct value for precise alignment.
-
If this is your first time enabling Spatial Marker support, you may see two system dialogs requesting permissions. Allow both.
-
Follow the on-screen instructions and look at your Spatial Markers through the headset to perform alignment.
-
Save the map.
Once complete, you should see a Marker icon next to your map name in the map selection list, indicating successful marker setup.
In the Manager app
Section titled “In the Manager app”- Spatial Marker-based maps will be tagged in your maps list
- Workflow is the same as with Meta Spatial Anchors
Editing Spatial Marker Map without the markers
Section titled “Editing Spatial Marker Map without the markers”If you open a marker-based map in the Map Editor in a location where the Spatial Markers are not present, the game will fail to detect them after a 30 second timeout, trigger a realignment, and switch the map back to Meta Spatial Anchors.
Save the map after realigning so you can continue editing it off-site without needing a duplicate set of markers.
To make the map marker-based again, follow the Creating a Spatial Marker Map steps with new Spatial Markers present.